How to wallpaper a room
From working out what kind of wallpaper you have to balancing colours and patterns, learning how to wallpaper a room can be a big step for the average DIY'er.
From working out what kind of wallpaper you have to balancing colours and patterns, learning how to wallpaper a room can be a big step for the average DIY'er. However, once you start breaking it down into more manageable chunks, you'll quickly realise that learning how to hang wallpaper is actually pretty easy — and it produces amazing results, too!
Let us take you through the process, from what tools you'll need and how to prepare your wall and measure up to getting that first piece of wallpaper ready, and you'll soon be hanging wallpaper like a professional!
Find which type of wallpaper you have
Let's start with what kind of wallpaper you have to work with and what your options are. There are three basic types of wallpaper — paste-the-paper wallpaper, pre-pasted wallpaper, and paste-the-wall wallpaper. Each has its advantages, so let's look at each one in turn.
Paste-the-paper wallpaper — This is your traditional type of paper that requires a pasting table to work on. With this kind of paper, you apply your paste to the back of the wallpaper and let it soak in for a while to relax the fibres and allow them to swell slightly. The advantage of paste-the-paper wallpaper is that it's usually relatively cheap and is great if you're on a budget. However, working with it can be a bit messy, especially if you have to trim the wet paper to fit.
Pre-pasted wallpaper - Forget about a bucket of wallpaper paste sitting around just waiting to be knocked over. This paper comes with its own paste already impregnated into the paper. To activate the paste, you will need to soak the paper in water and allow it to swell for a while before putting it on the wall. Again, this can be a little messy, but pre-pasted wallpaper is practical, simple to use, and requires less in the way of tools to hang.
Paste-the-wall wallpaper - This is the most popular type of wallpaper on offer today. Rather than pasting the back of the paper, you apply your paste to the wall and then hang the paper 'dry' from the roll. Because there's no messing around with soaking or sizing the paper (more on sizing in a minute), it's much quicker and easier to use. The results are fabulous, and the chances of 'getting it wrong' with paste-the-wall wallpaper are much lower. So if you've never wallpapered a room before, paste-the-wall wallpaper is your best choice.
Get your tools together
To get started, you'll need a few tools for the job:
- Wall filler and sandpaper — You'll need a smooth wall to get a smooth finish. Filler will sort out any cracks or holes and can be rubbed down to a silky smooth finish with sandpaper once dry
- Sharp craft knife and or scissors — use these to cut the paper to size and to trim edges and corners for a professional finish
- Wallpaper paste (unless you're using pre-pasted paper!)
- Bucket - for mixing the paste (again, only for paste-the-wall and paste-the-paper wallpapers)
- Trestle table — this is essential if you're using paste-the-paper but not necessary if you're using paste-the-wall paper
- Plumb line — so you can make sure that the first 'drop' is absolutely straight and even.
- Tape measure — No DIY'er should be without a tape measure!
- Paint brush or roller and tray - for applying the paste quickly and easily
- Wallpaper brush - for ensuring the paper is stuck down and bubble or crease-free
- Clean damp cloth - to clean off any paste on wallpaper surface or smooth seams
- Plenty of kitchen roll — for the inevitable spills
- Dust covers — to protect furniture that cannot be moved out of the room
Clean and prepare the walls
Before you can even think about hanging your first piece of paper, you'll need to make sure the wall is clean and properly prepared. Preparation is vital to achieving the best result and worth taking your time over. Start by removing the old wallpaper.
The easiest way to do this is to use a wallpaper steamer which uses heat and moisture to soften the paste so the paper can be easily removed. You may have to break out the scraper for stubborn bits, though! Once you've cleaned the wall, you can fill in any cracks or smooth down any rough areas.
If your wall has a plaster layer or is made from plasterboard, you'll need to 'size' the wall. Mix up a diluted paste that's quite runny and apply a layer to the whole wall using a roller. This will prevent porous surfaces from sucking the moisture out of your thick wallpaper paste and causing your paper to peel away from the wall. Allow the size to dry thoroughly.
Measure up
There's an adage that every tradesperson knows — measure twice, cut once! Take your time measuring and double-checking your figures before you start so you're sure you're right. The most important measurement you'll need is the distance from the top of the wall (up to the cornicing or edging or the ceiling itself) to the top of the skirting. The best place to start is in the left-hand corner of the room.
You should have already worked out how many rolls you need, but if you haven't, measure the walls, including the doors and windows and times the height by the width to get the square footage. Now measure your doors and windows in the same way and subtract that amount from your square footage total. You'll also need to calculate the pattern repeat and the useable yield, depending on whether your wallpaper is patterned or plain. Check out our Wallpaper calculator for more information.
Apply wallpaper paste
Unless you're using pre-pasted paper (which should by now be soaking in water to activate the paste), you're now ready to apply the wallpaper paste.
For paste-the-paper wallpaper, you'll need to lay your paper out on a trestle table, backing side up and patterned side down. Apply plenty of paste to the paper in sweeping brush strokes, ensuring you cover the whole area. Now you need to concertina or 'book' your paper up, paste-to-paste and allow the paste to soak in for a few minutes.
For paste-the-wall wallpaper, things are much easier. Mix your paste, break out your roller, and apply the paste directly to the wall. Make sure you're methodical about it, and use a brush to ensure the paste goes all the way to the edges.
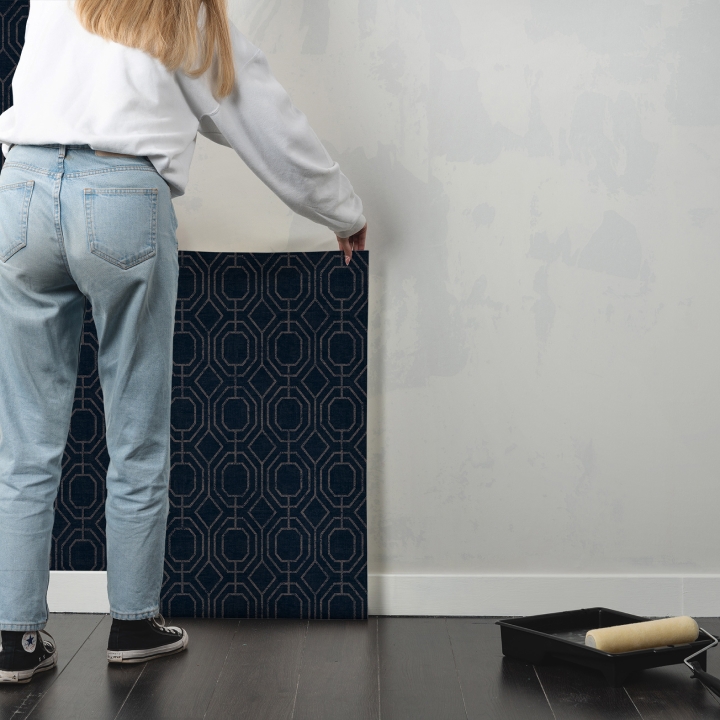
Hang the first piece of wallpaper
You're now ready to hang your first piece of wallpaper. With pre-pasted and paste-the-paper wallpaper, you'll need to position the corners carefully and then slowly let the paper unfold and drop down. As it does, smooth it down to push out any air bubbles and smooth out creases. Trim it to size (not too short!).
With paste-the-wall paper, you can hang the paper dry from the roll. Position the edge at the top (and this is where that paste brush could come in handy to add a little extra paste to the top of the wall), and carefully unroll the paper down, smoothing it against the wall's surface as you go. Rest the roll on the floor, gently press the paper into the crease along the top of the skirting board and trim with a sharp knife.
Step back and have a good look at your first piece. It needs to be straight so that the rest of the paper is in line and patterns don't go wonky! Tidy up as you go to prevent any trimmings from sticking to fresh pieces of wallpaper, the bottom of your boots, or the floor.
Wallpaper the rest of the room
It's time to carry on with the rest of the room. As you've started in the left-hand corner, your next drop will be to the right of the first drop. Paste the wall again (or paste your paper), and check precisely where the pattern matches so that you're trimming it correctly. The actual hanging process is the same as your first drop - just remember to paste a couple of centimetres wider than the width of the paper. Smooth down the next drop, checking down the seam that the pattern matches all the way to the bottom. Get rid of any air bubbles or creases, and you're ready for the next piece.
How to paper around corners and other tricky areas
Not every wall is smooth, flat, and with no tricky corners. Eventually, you'll encounter a window frame, a light socket, or even a fireplace. Light sockets can be removed (once the power is switched off!), and the paper is hung over the space and then cut to fit. For corners and other tricky areas, you may need to trim, tuck and even overlap to get a professional result. Check out our articles for more details.
Frequently asked questions
Q: How do you wallpaper a ceiling? — Carefully! The technique is exactly the same as hanging wallpaper on a wall, but you may need an extra pair of hands to help you. The trick is to start in the centre of the ceiling and work out to the sides so that you can adjust the paper for any changes in width.
Q: How do you wallpaper around windows? — Wallpapering around windows is a matter of careful measuring and trimming to fit. It should be relatively simple, but you must remember to avoid cutting the paper too short. Trim off the edges longer than you need, then press it into the edges of the frame firmly before doing the final trim. Make sure you've applied wallpaper paste right up to the edges to prevent it from peeling.
Q: How many wallpaper rolls do I need to cover a room? — The number of wallpaper rolls will depend on the square footage of the room. You can find this by multiplying the width by the height and then doing the same calculation for any doors and windows and subtracting that second number from your square footage. You'll need to consider pattern repeat and the usable yield of each roll (more if it's plain, less if it's patterned). Check out our Wallpaper calculator to get a quick and accurate figure.
Q: What's the difference between paste-the-wall wallpaper and other types? — With paste-the-wall wallpaper, you apply the paste directly to the wall and hang the paper from the roll 'dry'. With other types of wallpaper, you apply the paste to the back of the paper and allow it to soak in before hanging. Pre-pasted paper already has an adhesive on the backing paper which is activated by soaking in water.
Q: Do you need to use lining paper before wallpaper? — To get the best results, you should use lining paper before hanging wallpaper. For a truly professional result, you can crossline the lining paper (hanging it horizontally) so that the seams don't match up with the wallpaper seams.
Q: How do you line up wallpaper when you hang it? — Lining up your wallpaper will depend on whether it's patterned or plain. If it's not patterned, it's pretty simple and is often referred to as a free match type. But if it's patterned, it will depend on the pattern repeat and whether it's straight (the left and right sides of the paper match in a straight horizontal line) or offset (where the right-hand edge of the first strip only matches with the left side of the next strip, which is dropped down by a specific distance.